

")

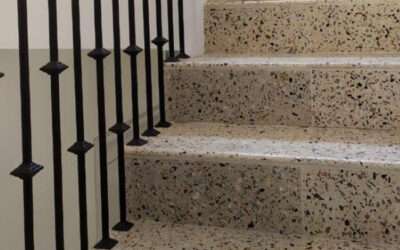
Terrazzo chips are small fragments made of marble, quartz, or glass, combined with a binding agent like cement or epoxy resin. These chips come in various colors, sizes, and textures, offering limitless design possibilities for your floors. Whether you prefer a subtle and elegant look or a bold and vibrant pattern, terrazzo chips allow you to customize your space according to your style and preferences.
Benefits of Installing Terrazzo Chips
Installing terrazzo chips over existing flooring offers numerous advantages:
Enhanced Aesthetics
Terrazzo chips create visually stunning floors that add elegance and charm to any space. The combination of colors and textures adds depth and character to your floors, making them a focal point of your interior design.
Durability and Longevity
Terrazzo chips are highly durable and resistant to wear, making them ideal for high-traffic areas. They can withstand heavy foot traffic, resist stains and scratches, and maintain their beauty for years to come.
Versatility
With a wide range of colors and chip sizes available, terrazzo chips provide endless design possibilities. From classic and traditional to modern and contemporary, you can achieve any desired look with terrazzo chips.
Easy Maintenance
Terrazzo floors are easy to clean and maintain. Regular sweeping and mopping will keep them in excellent condition. Additionally, the sealed surface prevents stains and moisture penetration, enhancing their longevity.
Preparation and Tools for Installing Terrazzo Chips

Before you begin the installation process, gather the following tools and materials: Safety equipment (gloves, goggles, mask), Floor cleaning supplies (detergent, mop, bucket), Floor repair materials (if necessary), Terrazzo chip mixture, Binding agent (cement or epoxy resin), Trowel or squeegee, Grinding machine or polisher, Polishing pads, Terrazzo sealer,
Step 1: Assessing the Existing Flooring
Assess the condition of your existing flooring to ensure it is suitable for terrazzo chip installation. Look for any cracks, unevenness, or damage that may affect the final result. If major repairs are required, consult with a professional before proceeding.
Step 2: Cleaning and Repairing
Begin by thoroughly cleaning the existing floor using a suitable detergent and mop. Remove any dirt, dust, or debris to create a clean and smooth surface.
Inspect the floor for any cracks, chips, or uneven areas. If you find any, use the appropriate floor repair materials to fix them. Ensure that the surface is level and free of imperfections.
Step 3: Applying the Binding Agent
Prepare the binding agent according to the manufacturer’s instructions. This typically involves mixing the cement or epoxy resin with water to achieve the desired consistency.
Using a trowel or squeegee, apply the binding agent evenly onto the cleaned and repaired floor. Ensure complete coverage and a smooth surface for the terrazzo chip installation.
Step 4: Spreading Terrazzo Chips
While the binding agent is still wet, start spreading the terrazzo chip mixture onto the floor. Use a trowel or your hands to distribute the chips evenly across the surface.
Apply gentle pressure to embed the chips into the binding agent. This ensures a strong bond and prevents them from dislodging during the grinding and polishing stages.
Continue spreading the terrazzo chips until the entire floor is covered. Take care to maintain an even distribution and avoid any gaps or overcrowding.
Step 5: Grinding and Polishing
Once the terrazzo chip mixture has dried and cured, use a grinding machine or polisher to flatten the surface. This step removes any excess binding agent and exposes the beautiful chips embedded in the material.
Start with a coarse-grit diamond pad and gradually work your way to finer grits, achieving a smooth and polished finish. Follow the manufacturer’s instructions for the specific machine and pads you’re using.
Step 6: Sealing the Surface
After grinding and polishing, thoroughly clean the floor to remove any dust or debris. Allow it to dry completely before applying the terrazzo sealer.
Apply the sealer using a clean mop or roller. Ensure even coverage across the entire floor. The sealer provides protection against stains, enhances the color of the chips, and adds a glossy finish.
By following the steps outlined in this guide, you can transform your floors into stunning, durable, and visually appealing surfaces. Remember to assess the condition of your existing flooring, clean and repair it as needed, apply the binding agent, spread the terrazzo chips, grind and polish the surface, and finally, seal it for long-lasting beauty. With proper maintenance and care, your terrazzo floors will continue to impress for years to come. For further information about How To Install Terrazzo Chips Over Existing Flooring, please contact us by clicking on the following Whatsapp link: +62 813-9283-8231 (Wicak) or +62 81-23615-8545 (Wahyu)


0 Comments